[back: part two of Iomeris’ cemetery] | [next: The End]
We’re not quite done with Iomeris’ cemetery yet. We’ve retrieved the ESSENCE OF WATER, the ESSENCE OF AIR and the ESSENCE OF FIRE, but we’re missing the last one. And we still need to gain access to the witch’s Death Chamber (IdC)!

Walkthrough:
- Enter the Temple of Wilderness (ToW):

- Go straight ahead until you reach the grate (a): open it and turn right
- Equip the AXE in your main hand and the EVERBURNING TORCH in your off-hand
- Save. You’re going to enter a room where the ceiling is slowly (but inexorably) moving down… until you get crushed. You’ll have to be as quick as possible:
- Enter the room (b),
- The door behind you closes suddenly: you’re trapped!
- Destroy both sets of jars (*),
- Pick up the LOCK PICKS (c),
- Open the chest with the LOCK PICKS and grab the KEYS,
- Use the IRON KEY in the wall lock (z),
- Search the wall (d) and press the hidden wall switch,
- Get out!
- Open the gate (e) with the GEAR KEY
- Release your Phoenix’ staff bolt on the golden statue mask [1] behind the chest (f), to get a set of LOCK PICKS
- Open the treasure chest (f) with the LOCK PICKS to retrieve IOMERIS BRACER (resist poison +30)
- Exit this hallway and go to the south-eastern corner of the Temple at (g)
- Pick up the CRYSTAL FLOWER (g)
- Release your Phoenix’ staff spit on the golden statue mask [1] to open the grate [1]
- Pick up the 2 pieces of BLOODDROP CAPS (h)
- Note: you may use one of these BLOODDROP CAPS combined with a BLACKMOSS (you can find some outdoors, if needed) to brew the FIRE BOMB you need to melt the annoying ice cube in the attic of the Temple of Ice
- Go all the way to (i) following the red spots’ trail
- Pick up the MUDWORT (i)
- If you play with the pressure plate [], you’ll discover that it will open the secret door (y) behind, when somebody steps on it… but it doesn’t get triggered by items. This means you’ll need to find and ask a “friend” to stay still on the pressure plate while you explore the alcove behind the door. We’ll achieve that later!
- Climb up the ladder (j)
- Standing on the tile (k), launch a Phoenix’ bolt eastwards to hit the golden statue mask [2] and trigger the grate [2] open
- Pick up the MUDWORT (L)
- Release a Phoenix’ staff spit westwards to hit the golden statue mask [3] and trigger the grate [3] open
- Pick up the ROCK (m) and drop it down in the pit to open the grate (n) below
- Note: this action is pictured in the drawing you found earlier in the Temple of Flames:
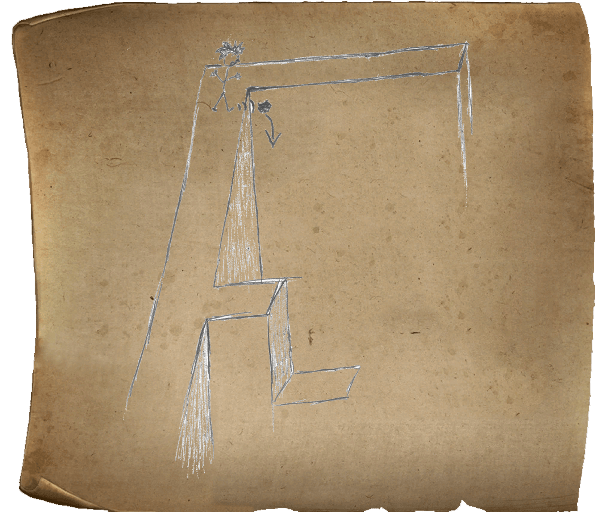
- Note: this action is pictured in the drawing you found earlier in the Temple of Flames:
- Jump onto the tile (o) and release a Phoenix’ staff spit eastwards to hit the golden statue mask [4] and trigger the grate [4] open
- Jump down at (p) and launch a Phoenix’ bolt on the golden statue mask [5] to open the grate [5]
- Turn over to activate the lever behind you: this will open the grate (q)
- Crane your head down to spy on the woodland guardian (!): wait until he goes into the alcove (q) and toggle the lever (p) to lock him up
- Jump down and go to the alcove (n)
- Pick up IOMERIS LOAFERS and quickly replace them with the pair of simple SHOES you found earlier in the Temple of Flames: this should disable the poison trap before it gets released
- DON’T pick up the ROCK on the pressure plate before you leave: we need the door (n) to stay open
- Leave this area and come back to the Temple’s nave where you find a stone circle with a stone pile at its heart (r)
- Read the wall texts (-): they warn you about the “dormant stones” and encourage you to hurt it… rather than feeding it
- If you feel like fighting with a stone golem, you could add a ROCK to the stone pile in order to feed the golem and “enrage” him; but we’d better make him a “friend” (…or a slave): hurt the stone pile with your AXE (or even with your bare hands)
- The stone golem should wake up. He’ll obediently follow you wherever you go (as long as you stay in the Temple of Wilderness: he won’t follow you outside the Temple). Stay in his line of sight if you want to be followed
- Warning: try to not get stuck because of the golem. You should always make sure you have a way out before you enter a corridor: the stone golem has no brain and he will just blindly follow you but he’ll also won’t let you pass if you need to go back…
- Open the door (s) and enter the cage: the stone golem will follow you and toggle the pressure plate (s), allowing you to go past the opened grate (t)
- Pull the chain that opens the grate (u) to arrange a way out of these cells
- Pick up the SCROLL (v): it’s a recipe for the POTION OF VITALITY
- Take the TEMPLE KEY ( w)
- Come back to the nave
- Go all the way back to (i). Make sure the stone golem is following you
- Climb up the ladder (j) and jump onto the lower platform (p)
- Toggle the lever to free the woodland guardian (!)
- Wait until the wild creature enters the alcove (n) and quickly proceed as follows:
- Jump down and retrieve the TEMPLE KEY in the alcove (q)
- Leave the area
- Go to the south-western corner of the Temple, following the blue spots’ trail
- Look north through the grate: your stone buddy should spot you and try to catch you up
- Note: make sure that the grate between you and the stone golem is closed
- As soon as the stone golem steps onto the pressure plate [], the secret door (y) opens
- Walk into the alcove and retrieve your loot: the legendary TOME OF EARTH (read it to gain +20 permanent resistance to poison damage]
- Exit the Temple of Wilderness
- Come back to the nave: your rocky friend is back asleep in the stone circle (r). Wake him up again
- Go back to (i) following the red spots’ trail
- Climb up the ladder (j)
- Jump onto the lower platform (p)
- Spy on the woodland guardian (!) and wait until he enters the alcove (q)
- Toggle the lever to trap him
- Jump down
- Use your TEMPLE KEYS in the wall lock (x)
- You did it! Retrieve the ESSENCE OF EARTH (@)
- Before you leave, read the wall text between (u) and (g): it’s a hint regarding a potential boon that Tjalafez could grant you
- Open the HOLY BIBLE OF LOVE: there are 10 commandments. You need to discover the 11th one
- If you quickly come back to the Chapel of Love in the upper floor (Busipah’s Mausoleum), and interact several times with the magical stone head there, you’ll find out that there is, indeed, a hidden commandment:
Take naps on the sand.
- Rest on the sand (press [r]) in the middle of the Chapel: you gain the “POISON RESISTANT” trait
- Go to Iomeris private Quarters (IpQ):

- Climb up the ladders (a)
- Once you’re at the entrance of the maze (b), prepare for the next challenges by equiping every piece of gear that will protect you against elemental damages. The best solution here is to wear Iomeris’ complete outfit:
- IOMERIS HAT
- IOMERIS ROBE
- IOMERIS PANTS
- IOMERIS LOAFERS
- IOMERIS PELT
- IOMERIS TORC
- IOMERIS BRACER
- IOMERIS GLOVES
- (you don’t need to wear the BLACK SCEPTER)
- If you’ve read the 4 TOMES OF ELEMENTAL PROTECTION before, you should now have a 100% resistance to all elements. If you don’t, brew some potions with your MORTAR & PESTLE to adjust your resistance levels:
- A POTION OF STRENGTH will raise your resistance against fire damage
- A POTION OF DEXTERITY will raise your resistance against shock damage
- A POTION OF VITALITY will raise your resistance against poison damage
- A POTION OF WILLPOWER will raise your resistance against ice damage
- Pass the fire challenge following the red arrows and pick up the POTION OF HEALING (c)
- Pass the earth challenge following the dark green arrows and pick up the POTION OF HEALING (d)
- Pass the ice challenge following the dark blue arrows and pick up the POTION OF HEALING (e)
- Pass the air challenge following the light blue arrows and pick up the POTION OF HEALING (f)
- Use a POTION OF HEALING if you happen to be wounded
- Go to the crossing at (*): you’ll be targetted by 4 elemental arcane bolts coming from every directions; heal yourself if needed
- Pick up the TOMB KEY (g)
- Come all the way back to (b) and heal yourself if you’re wounded
- Go to Iomeris’ death Chamber (IdC)
- Use your TOMB KEY in the wall lock (h) to open the stone gate
- At the back of this room you discover Iomeris’ sarcophagus (j), protected by a magical barrier (*)
- There are 4 elemental shrines here:
- The beacon of Earth [E]
- The beacon of Fire [F]
- The beacon of Air [A]
- The beacon of Water [W]
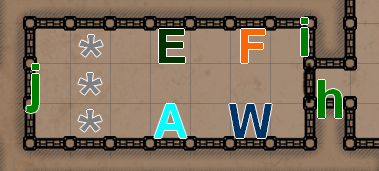
- Read the wall text (i)
Elemental shrines need to be activated in a specific order.
Only he who looks at things from a distance
Will manage to see the big picture…
And be revealed the right pattern. - Tap [TAB] to display the map and see the big picture of Iomeris’ cemetery. Don’t you notice anything when you look at the 4 temples? Their design depicts a letter and a number:

- These letters and numbers display the order in which you have to place the elemental essences in their respective shrines:
- Put the ESSENCE OF EARTH in its shrine [E]
- Put the ESSENCE OF WATER in its shrine [W]
- Put the ESSENCE OF AIR in its shrine [A]
- Put the ESSENCE OF FIRE in its shrine [F]
- The 4 essences should suddenly explode one after another (E, W, A, F) while the whole building starts shaking…
- The magical barrier (*) disappears and Iomeris is forced to come out of her sarcophagus… but gets immediately burnt and dies!
- Pick up IOMERIS SKULL
- Exit Iomeris’ cemetery
Some of these tips don’t work or are unclear? You need further help? Your game is bugged?
Please email me: ydaujeard@gmail.com
