[back: Busipah’s mausoleum] | [next: part two of Iomeris’ cemetery]
This is the dark domain of Iomeris, Fidoc’s spouse. Iomeris was the Queen and a mother of 4 sons, but we’ll also discover that she was an evil necromancer who strove for immortality.
Iomeris’ Cemetery shelters 5 small puzzles (I, II, III, IV, V) and 4 Elemental Temples: the Temple of Ice (ToI), the Temple of Murmurs (ToM), the Temple of Flames (ToF) and the Temple of Wilderness (ToW).
Your goal here is to reverse Iomeris’ curse and destroy her. To do so, you’ll need to collect her complete outfit and find the tomes of protection hidden in the 4 Temples, to become immune to the 4 elements. This will allow you to freely walk into her private quarters (IpQ) and reach the key to her death chamber (IdC). You’ll also need the 4 elemental essences lying at the heart of the 4 Temples, to disable the magical barrier of her sarcophagus.

Walkthrough:
- Grab the ROCK (a) on the grass
- Let’s deal with the first puzzle (I):
- Note: the spiral staircase in this area is merely a reset mechanism meant for players who messed up with Fidoc’s tomb key in their first run. The ones who pushed the button with the warning sign (“DON’T”) in the upper level, get a chance to have the key ascended back to its original location (level -1). But since we safely retrieved the key in Busipah’s mausoleum, we don’t need to care about this staircase.
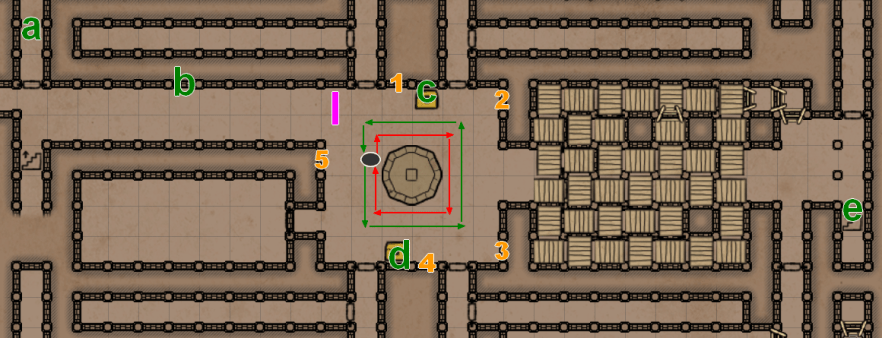
- Read the wall text (b): Iomeris is challenging you to retrieve her black Scepter and tells about a “secret chest”
Only he who shares my blood
may trigger the black magic
of my precious Scepter and
be guided to my secret chest. - Read the 5 wall texts (1 – 5): it’s a code. If you merge the words together, here is what the complete message would read:
Start in front
of her; turn
clockwise once, then
counterclockwise twice: do
not open it. - Okay… let’s try to follow those directions: starting on the tile marked with a big grey circle (O), walk around the fountain following the red arrows ONCE, then the green arrows TWICE
- A treasure chest should appear at (c). But remember the warning: do not open it!
- Look at the tile (d) opposite to the chest: you could see some magic in the air, isn’t it? (as there was actually on the tile where the first chest has appeared)
- So, if we’re not allowed to open the chest (c)… maybe we should reverse the instructions to make another chest appear at (d)… that we’ll be able to open. The reversed text would read:
Start in front
of her; turn
counterclockwise once, then
clockwise twice:
open it. - Starting on the tile marked will a big grey circle (O), walk around the fountain following the green arrows ONCE, then the red arrows TWICE
- A treasure chest should appear at (d). Open it: you obtain IOMERIS SCEPTER!
- Equip the scepter and exit to the surface (e)
- Activate the SCEPTER (right-click): it will start vibrating, attracting you to the location of Iomeris secret chest (follow the red arrows):
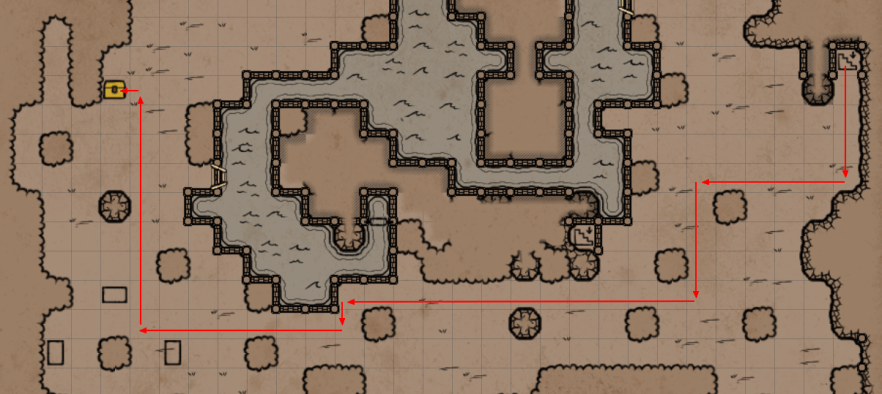
- Dig up the chest to obtain IOMERIS GRIMOIRE
- If you read it, you’ll learn about Iomeris’ misdeeds, and how she managed to capture the Sun’s elemental essence to grant her and her sons the eternal life. You’ll also learn about the 4 Temples she built to glorify the Elemental Lords of Earth, Fire, Air and Water. As a matter of fact, those Temples also shelter the 4 ELEMENTAL ESSENCES we need to reverse Iomeris’ curse, put an end to Fidoc’s doom… and eventually release the Sun’s essence
- Come back to Iomeris’ Cemetery to face puzzles (II) to (V):

- Our goal here is to retrieve the 4 KEYS leading to the Temples’ Archives
- Let’s start with the easiest puzzle (II):
- Standing on the pressure plate (f), put an item on the pressure plate in front of you to open the grate;
- Move forward: the grate behind you will close suddenly;
- Take the FLAMES TEMPLE ARCHIVES’ PASS (g);
- Turn over to face south;
- Pick up the item you put earlier on the pressure plate you’re standing on;
- Put it on the pressure plate in front of you to open the grate;
- Exit.
- Go south to the corridor at (III):
- Put an item on the pressure plate (h);
- Move forward: the grate in front of you will close;
- Read the wall text (i): “You rock“. It’s a hint for the next steps of this puzzle;
- Step back to let the grate open again;
- Throw an item towards the south: it should land on the pressure plate (j), which will open the grate behind it;
- Now our goal is to toggle the last pressure plate (k); but it’s too far to reach with a standard item (like a torch or any gear piece): we need a very light projectile… like a ROCK, for example (actually, anything that weighs less than a few hundred grams should work: a KEY, a GEM…);
- Standing on the tile at (h), Throw a ROCK towards the south: it should land on the pressure plate (k), locking the grate (i) in the upper position and allowing you to step forward;
- Walk to the pressure plate (k) to retrieve the WIND TEMPLE ARCHIVES’ PASS;
- Exit.
- Areas (IV) and (V) can be treated as 1 big symetrical puzzle: in each of these rooms, your aim is to reproduce what you’ve seen behind the grates in the opposite room (like in a mirror). This means you can’t achieve a puzzle without visiting the other one first: you’ll have to visit both rooms and memorize (or write down…) their exact configuration
- Note: the wall button (o) at the entrance of each room is a “reset” switch
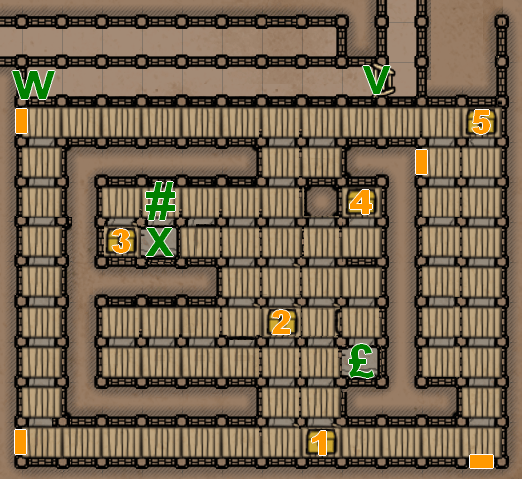
- Let’s start with puzzle (IV): go to the southern area (V), grab the TORCH on the floor (L) and memorize the interior design of the row behind the grates (V)
- Go to the northern area (IV) and proceed as follows:
- Pick up the ANCIENT HELM (m)
- Pick up the WOODEN CRATE (5)
- Pick up the RING GREAVES (n)
- Destroy the crates & barrels at (4) and take the TORCH on the wall
- Reset the puzzle (o)
- Put the WOODEN CRATE on the floor at (1)
- Hang a TORCH on the wall holder at (2)
- Put the ANCIENT HELM on the floor at (3)
- Damage the crates & barrels at (4). Don’t destroy them: just hit them once or twice (they should look damaged)
- Drop the RING GREAVES at the statue’s feets (5)
- Hang a TORCH on the wall holder at (6)
- Completely destroy the crates & barrels at (7)
- The door leading to the alcove (o) should open! Go and grab the ICE TEMPLE ARCHIVES’ PASS
- Before switching to the opposite area, memorize the the interior design of the row behind the grates (IV)
- Grab the TORCHS on the wall and leave to the next puzzle (V)
- Proceed as follows:
- Pick up the LEGIONARY SPEAR (p)
- Destroy the jars at (4) and hang a TORCH on the wall holder
- Reset the puzzle (o)
- Destroy the jars at (1) and pick up the RAPIER
- Hang a TORCH on the wall holder at (2)
- Put the LEGIONARY SPEAR on the floor at (3)
- Let the jars intact at (4)
- Insert the RAPIER in the statue hands at (5)
- Make sure the wall torch holder is empty at (6)
- Let the damaged jars as they are at (7)
- The door leading to the alcove (q) should open! Go and grab the POISON TEMPLE ARCHIVES’ PASS
- Leave this area. It’s time to pay a visit to the Temples’ Archives…

- Open the door to the Temple of Flames’ archives (r) and rob the 2 books marked with a blue dash (-) on the above map
- The FIRE ARCANE BASICS book will grant you 1 skill point in fire magic (allowing you to enter the Temple of Flames)
- The TOME OF KNOWLEDGE will allow you to allocate 1 point in the skill of your choice
- Open the door to the Temple of Ice’s archives (s) and rob the 2 books marked with a blue dash (-) on the above map
- The WATER ARCANE BASICS book will grant you 1 skill point in water magic (allowing you to enter the Temple of Ice)
- You also get another TOME OF KNOWLEDGE
- Open the door to the Temple of Murmurs’ archives (t) and rob the 2 books marked with a blue dash (-) on the above map
- The AIR ARCANE BASICS book will grant you 1 skill point in air magic (allowing you to enter the Temple of Murmurs)
- You also get another TOME OF KNOWLEDGE
- Open the door to the Temple of Wilderness’ archives (u) and rob the 2 books marked with a blue dash (-) on the above map
- The EARTH ARCANE BASICS book will grant you 1 skill point in earth magic (allowing you to enter the Temple of Wilderness)
- You also get another TOME OF KNOWLEDGE
- Now we’re ready to explore the 4 Temples!
- Let’s start with the Temple of Ice (ToI) in the south-eastern corner of the map
Ground floor:

Upper floor:
- Read the warning (è): you better not get spotted by one of the 4 Ice Guardians in this area! They are marked with orange triangles on the map: one is facing East, two are facing South, and the last one is facing West
- Note: remember you can always safely pass an ennemy in the back, but as soon as you approach on their sides, they will spot you
- Do NOT open the grate next to the “welcoming” wall text (è): as a matter of fact, one of the Ice Guardians is waiting for you in the dead space behind the grate… (you might have noticed its shadow reflecting on the northern wall?)
- Let’s start with the upper floor: climb up the ladders (v) until you reach the attic
- Go to the end of the corridor and read the wall text ( w): this is an “ice-sliding maze”. That is to say, you won’t be able to control your moves in this area (unless you bump into a wall). You also learn about the multiple treasure chests… except one of them is trapped with a mimic!
- First, let’s find out which chest is trapped, so that we can safely open the other ones: enter the maze and try to reach the 4 wall texts marked with a yellow dash (-) in the area. You should learn that:
- “The trapped chest is not facing EAST” => chest [1] is safe
- “The chest surrounded by ice on 4 sides is not trapped” => chest [2] is safe
- “The chest next to a hole is not trapped” => chest [3] is safe
- “The trapped chest is not facing SOUTH” => chest [4] is safe
- As a conclusion: chest [5] is trapped. Don’t open it!
- Open the chest [1]: you get a piece of SHEET MUSIC
- Open the chest [2]: you get the recipe for the POTION OF WILLPOWER
- Brew a FIRE BOMB with your MORTAR & PESTLE and throw it at the ice cube at (#) to make it melt
- Note: if you’re missing an ingredient, don’t worry: you’ll find some plants in the Temple of Wilderness. Just wait until then and come back later
- Open the chest [3]: you get IOMERIS PELT
- Let yourself fall in the hole (x): you’ll end up in the water in the lower floor
- Take the LOCK PICKS in the alcove (y)
- Use the ladders to get off the water. Save.
- Jump into the water at (z) and go west until you reach the ladder (µ): climb it up to take a breath
- Back into the water, follow the corridor until you reach the lever (+)
- Toggle the lever (+) to open the grate ([) in the intermediate underwater corridor above you
- Quickly come back to the ladder (µ) to take a breath
- Plunge back into the water and climb up the ladder (µ) again but this time, only 1 step upwards. From here, strafe right to reach the intermediate water corridor leading to the ladder at (=)
- Climb up the ladder (=) and grab the POTION OF DEXTERITY
- Fall down in the lower underwater floor to the east
- Immediately turn right to pull the chain (*) located under the Ice Guardian: this will trigger an underwater secret door at (¤)
- Go to (¤), climb up the ladder and pick up the TOME OF WATER in the alcove (read it to gain +20 permanent resistance to ice damage)
- Jump back into the water and come out at (%) to take a breath. Then dive again and follow the underwater corridor until you reach the alcove at (&)
- Pick up the TEMPLE KEY in the alcove (&) and immediately strafe right twice to reach the ladder (µ) so that you can take a breath
- Save. Go all the way to exit the water at (%)
- Note: you can make short stops at (=) or (¤) if your energy gauge is not high enough to go all the way to (%)
- Go back upstairs using the huge ladder at the entrance of the Temple (v)
- In the ice-sliding maze, go to the chest [4] and open it with the LOCK PICKS: you’rewarded with a second TEMPLE KEY
- Save. Let yourself fall in the hole (£): you’ll plunge into the water downstairs
- Immediately go north and climb the ladder 1 step to toggle the pull chain (*)
- Don’t climb all the way up! It would alarm the Ice Guardian at (“)
- Pulling the chain triggers an underwater grate at (“)
- Climb down and take a breath using the ladder at (é); but don’t exit: we’re not finished yet
- Go past the opened grate (“) to get your loot: IOMERIS ROBE
- Exit the water at (é). Save
- Use one of your TEMPLE KEYS in the lock (ù): this will open an underwater grate below your feets
- Jump into the water at ($) . Beware: there is a monster waiting for you here. You’ll automatically get spotted; be quick!
- Pick up the CRYSTAL FLOWER ($), then use your second TEMPLE KEY in the wall lock (ç)
- Climb the ladder once and pull the chain (*) to toggle the exit grate
- Climb up to retrieve the ESSENCE OF WATER (@): you did it!
- Save. Strafe right and exit the Temple of Ice without getting spotted by its guardians
Some of these tips don’t work or are unclear? You need further help? Your game is bugged?
Please email me: ydaujeard@gmail.com
