[back: Rukashan’s crypt] | [next: Busipah’s mausoleum]
It’s time for a quick and short excursion in the open air. Look at all these treasure maps and codes we’ve accumulated so far: we need to dig up some chests!

Walkthrough:
- Go all the way up until you reach the dungeons’ exit (use the shorcuts)
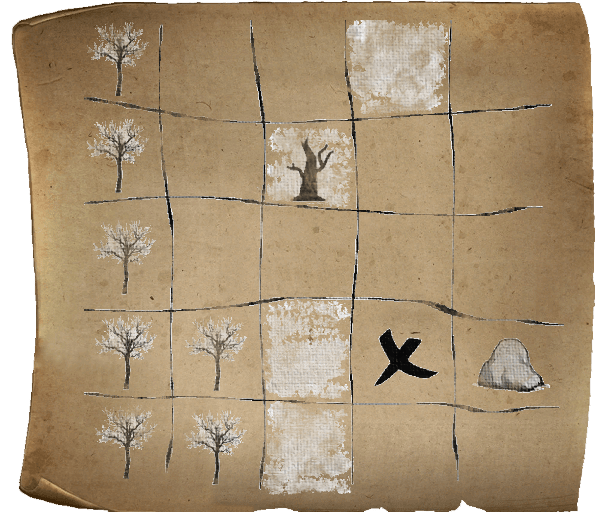
- First puzzle: remember those pieces of code on the wall texts in Busipah’s Mausoleum center room? Just follow the instructions:
- Starting from the stairs’ exit at (a)
- Move forward 4
- Strafe left 3
- Move forward 5
- Strafe right 1
- If you’re wondering how you were supposed to know these directions have to be followed in this specific order, the answer is: you were’nt. You can only deduce that from the configuration of the ground in this area (obstacles). As a matter of fact, if you try another combination, you would stumble on a rocky wall or on a tree on your way
- Unearth the CRYSTAL SHIELD (b)
- Remember Havotep’s riddle?
See the tiniest of all willows
Right outside, being watched by crows?
…
Want to know where I hid my boots?
To find out, back to the roots! - Have a look in the sky: there is a whole bunch of crows flying in circles over the tiny dry willow at (c). Destroy the tree and dig under it to obtain the LURKER BOOTS: you should now possess Havotep’s complete outfit
- Jump into the water at (d) and use the STAINLESS STEEL KEY in the lock (e) to open the grate
- Open the treasure chest, pick up the BRONZE BRACE and quickly exit the water using the ladder (f)
- Prepare yourself for some fishing: go in the water again (stay close to the ladder) and try to grab some SILVER ROACH with your bare hands. 2 of them should be fine
- Put the EMPTY FLASK at the bottom of the pond. Wait 1 second. Take it back: you now have a FLASK OF WATER
- Climb back up
- Unfold the treasure map you found earlier in Rukashan’s Maze of Chimeras:
- It’s pointing at a tile located between a rock and a grove, south from the dry tree where we found the BRANCH in the early game, in the western part of the map
- Dig up the MIRROR CUISSE (g)
- Unfold the treasure map you found earlier in Rukashan’s Cube Puzzle room:

- The drawing looks faded, but we can still notice a treasure chest between a bridge and a grove: this points out to the northern part of this map
- Dig up the chest (h) to obtain the ROPE
- Equip the ROPE and use it on the pit at (i): you land in a cave full of surprises!
- Harvest everything in the area (don’t forget the ETHERWEEDS underwater): those herbs might come in handy later on. You should collect:
- 3 pieces of CRYSTAL FLOWER
- 3 pieces of BLACKMOSS
- 3 pieces of ETHERWEED
- 2 pieces of BORRA
- 2 pieces of BLOODDROP CAP
- 2 pieces of FALCONSKYRE
- Exit via the southern teleporter to emerge at (j)
- Go all the way back down to Rukashan’s Maze of Chimeras (III):

- In the Maze, climb up the ladder located in the back of the room on your right
- Beware of the XELOROID in the upper left corner of the Maze (!): pass as quickly as you can (use your “strafe right” ability)
- Follow the magical bridge and press the wall button to make a further section of magical bridge appear (f)
- Walk on the top of the library and pass the door (B)
- Standing on the tile at (¤), let some useless stuff fall down in the pit to toggle the pressure plate at the bottom of this level and trigger a secret door behind you
- Pick up the MIRROR GAUNTLETS, Rukashan’s last piece of outfit
- Go to the eastern end of the corridor
- Pull the chain to open the grate and use the ROPE to access the secret back room of Tjalafez’ Chapel of Love in the lower level (Busipah’s mausoleum)
Some of these tips don’t work or are unclear? You need further help? Your game is bugged?
Please email me: ydaujeard@gmail.com
