[back: Havotep’s vault] | [next: Outdoor jaunt]
This is the tomb of Rukashan, Fidoc’s 3rd son. Rukashan was known as “the Seer”.
He’s got a large crypt, full of ghosts, chimeras and souvenirs. There are 6 puzzles here (I, II, III, IV, V, VI). The fifth and sixth ones may be completed later in the game.
Your goal is to retrieve Rukashan’s skull. And possibly, his 6 other relics (note that getting all relics is optional and will not prevent you from finishing the game).

Walkthrough:
- When you arrive in this level, the secret shortcut (L) is closed. We’ll be able to open it later
- Go to the spur at (a) and take the TORCH on the wall. Have a look in the room (IV): we can see Rukashan’s tombstone below. But it would be reckless to jump down right now: we need to find a way around
- Climb the ladder (b) and hang the TORCH to the wall torch holder; this will trigger a secret door (c)
- Go down (c) and retrieve Rukashan’s first relic: the MIRROR TAGELMUST
- Climb back up and follow the corridor; fall down at (d) and pull the chain on the right wall to open a secret door and discover a treasure chest holding Rukashan’s second relic: the MIRROR CHESTPLATE
- Go down the stairs until you reach the first puzzle of the crypt (I): the Souvenirs’ Collection of the seer
- There are 11 floors in this area, each one sheltering 5 chests and 1 riddle. In each floor, the chest next to the correct answer of the riddle holds a BRASS KEY. The other chests are trapped. Beware! Here are the riddles and their correct answers:
Im a fragile box
Without any locks.
What’s inside
May come alive.
If you break me now,
You’ll never know.
The answer is: an EGG
I can melt snow
And dispel sorrow.
To make things brighter
I need a lighter.
The answer is: FIRE
I you want to flee,
First unlock me;
For I’m made to bind
And keep you confined.
The answer is: a CHAIN
“Never straight forward”
Is my art of walking.
“Always pinch hard”
Is my art of living.
The answer is: a CRAB
I’m made of rivers,
Cities and borders.
I’m no fantasy,
Yet I’m no country.
The answer is: a MAP
I’m a simple tool,
Designed to harvest.
But let’s be honest:
Im here for your soul.
The answer is: the SCYTHE
Your blood is my feed,
My sting is my might,
Beware of your sleep,
For I hunt at night.
The answer is: MOSQUITOS
Even when tiny,
Everyone fears me.
I haunt your dreams,
Provoking screams.
Don’t fall in my hook,
Or you’ll turn out crook.
The answer is: a SPIDER
Unlike most of plants,
I’m averse to light.
I’m not prone to blight,
But to certain ants.
Be cautious when you eat my kind
As we might dazzle your mind.
The answer is: a MUSHROOM
Keep it gentle:
It’s more effective than whipping.
Make it as sharp as a sting:
It becomes judgmental.
The answer is: the TONGUE
If you’re good at it, you’re worthless.
If you know it, you’re brainless.
If you say it, nobody will hear a sound.
If you wear it, they will look at the ground.
The answer is: NOTHING
- When you are done with the 11 riddles, come back to the main floor and take the western corridor. Use the BRASS KEYS to open the 11 grates. You should emerge in the Seer’s Library (II)
- Explore the different bookshelfs to find 2 ancient writings of knowledge: the BOOK OF SPIRITUALITY I and the BOOK OF SPIRITUALITY III (–)
- Note: you might read both books right now. Regarding the skill point, it would be wise to invest in Concentration: this would help for the last puzzle (VI) of this level. But don’t worry: if you prefer to invest in another skill, go ahead. You will be able to complete the puzzle (VI) later anyway
- Read the wall text (e): it’s a code. To solve it, you need to follow the right directions… in a race against time. Press the glowing blue switch facing the wall text and start immediately moving, following these steps:
- Row #1 from East to West
- Row #3 from West to East
- Row #5 from East to West
- Row #4 from West to East
- Row #2 from East to West
- If you were quick enough, the door (A) in front of you should open, granting you access to the next puzzle: Rukashan’s Maze of Chimeras
- Note: to improve your swiftness, avoid turning left or right since it would make you waste precious seconds. Rather use your ability to strafe (left or right) and move forward/backward
- Repeat the same process with the second puzzle of this area (f): at the end of your race, the door (B) in the upper floor should open
- Enter the Maze of Chimeras. It’s a 3D labyrinth made of invisible walls and magical floors. Don’t worry about the wandering monsters: they can’t hurt you… except the OCTOPUSES and the XELOROIDS! Octopuses can move around the maze to hunt you, whereas Xeloroids are patiently waiting for you to pass them. The first ones will attack from their back and spray a deadly dark ink on you. The second ones will leap at you and litterally “suck up” your face: you need to be as swift as possible when you pass them
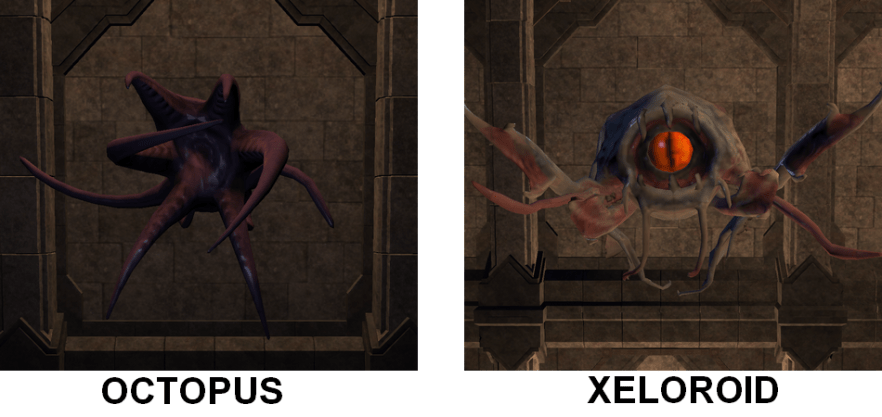
- The 2 Xeloroids are marked with a (!) on the map. The one in the upper left corner is on the 2nd floor. The other one is on the 4th floor: he’s guarding the exit (h) of the maze
- Every wall buttons in this area have the same effect: they will toggle the magical bridges allowing you to access further parts of the maze. Unfortunately, triggering a section of magical bridge will disable another section. So, you’ll have to alternate and trigger on & off the magical bridges, depending on where you want to go…
- There are 3 grates that need to be opened before you can access the maze’s exit (h). Each one is marked with a colored dash on the map (|) (–) (|). Those grates get triggered by pull chains disseminated in the maze (marked with small colored circles). Pull them in this order:
- First, toggle the brown pull chain (it’s located on the main floor)
- Secondly, toggle the purple pull chain (it’s located on the third floor)
- Thirdly, toggle the light blue pull chain (it’s located on the third floor)
- On your way, you might want to pick up the TREASURE MAP (g) lying on the main floor (to do so, you need to climb up the southern ladder and fall down behind the ladder; make sure the magical bridge is disabled first)
- Once you’ve opened the 3 grates (|) (–) (|), you can access the exit of the maze (h). To reach it, you’ll need to pass the southern XELOROID while pressing the wall button in front of him very quickly (use your “strafe right” movement capacity), to make the last section of magical bridge appear
- You did it! Take the lift to the ground floor, pick up the CUBE KEY and leave the maze
- Use the CUBE KEY on the golden lock (i) to open the big wooden door
- Enter Rukashan’s Death Chamber and go straight to the elevator (k). Go up and follow the south-eastern passageway until you reach the secret shortcut to the entrance (L): jump down and press the blue glowing switch to trigger the secret door. You can now reach the lower floor easily, falling down on the small platform next to the entrance. If you need to come back upstairs, just take the elevator (k)
- Now you might be able to immediately complete the sixth puzzle (VI): Rukashan’s meditation room. An energy gauge of at least 150 is required. Here is how you can achieve that:
- You start the game with 60 energy points
- Wearing the LURKER PENDANT will raise this level to 110 (60 + 50)
- Reading the BOOK OF SPIRITUALITY I will raise it by another 25 points
- Allocating the skill point of the BOOK OF SPIRITUALITY III in Concentration will raise your energy gauge by another 20 points, to a grand total of 155
- If you’re not able to fullfil one of the above requirements, come back later and skip the steps 24 to 31 below (go directly to step 32)
- Read the wall text (m)
Only the most patient and toughest
minds shall access the inner sanctum.
Do not enter if you’re not
ready to suffer my mental probe. - Open the door and walk onto the first tile marked with (§), between the two fallen stone statue heads: the Seer’s trap will “soak up” your mind, absorbing 75 energy points
- Rest a little bit (“r” key) until your energy gauge gets fully restored
- Move forward: the second magical trap will now steal up to 150 energy points from you. Well done! You passed the test
- Talk to the statue head (£) in front of you: you are rewarded by the Seer and gain the [Strong Mind] trait (+2 Willpower)
- Touch one of the crystals to recharge your energy gauge
- Pick up the POTION OF WILLPOWER (µ)
- Pick up the BOOK OF SPIRITUALITY II (ç); you might as well read it right now
- Take the elevator (k) and follow the south-western passageway until its end (n)
- Prepare for another race against time: the blue glowing switch (n) will trigger a secret door downstairs (o), but only temporarily. You’ll have about 20 seconds to get there
- Press the switch and proceed as follows:
- Move backward x4
- Strafe right x7
- Move forward x4
- Strafe left x1 (you enter the elevator)
- Toggle the lever
- While the lift is going down, turn right once
- Pull the chain and exit the elevator (move forward x1)
- Strafe right x4
- Move backward x3
- Strafe left x2
- Move forward x1. Here your are!
- Take the MIRROR GREAVES and exit the alcove and the meditation room
- Read the wall text (p). The “seer” seems to have turned into an evil megalomaniac over the years… he is challenging you to retrieve the 3 SMALL KEYS protecting his tombstone’s magical glyph against intruders. Don’t fall down!
- Crane your head down to look into the pit (IV): it’s full of mummies, skeletons and ghouls. But if you pay close attention, you’ll also notice tiny shiny items at (q), (r) and (s). Those are the SMALL KEYS Rukashan was talking about. Your goal is to retrieve those keys without getting hurt…
- This puzzle (IV) is like a giant checkerboard. The eastern row of levers (marked a to i) and the southern row of levers (marked 1 to 9) will toggle the trapdoor floor tiles in the pit, when combined together. For example, activating both levers (2) and (d) will toggle the trapdoor at (r)
- There are 2 ways of solving this puzzle:
- You could get every foes to fall down to the lower level, making sure to keep the 3 SMALL KEYS intact, and then reset every levers so that you may safely go down and pick up the SMALL KEYS, once all ennemies have been removed from the pit. But if you want to proceed this way, you’d better wait until you’ve made sure to not compromise your future exploration of the tombs! Remember that this is a consistent game, where all levels are connected. If a mummy or a skeleton falls down now, you will have to face them later in the lower level. So, only proceed that way if you already visited Busipah’s Mausoleum and explored the room located below Rukashan’s Death Chamber;
- Another way to go is to toggle the levers targetting the specific trapdoors where the SMALL KEYS are lying. You need to make sure there is no monster on the targetted tile before proceeding, else the KEY will fall together with a monster. Proceed as follows: toggle levers (6) & (a). Then reset those levers to avoid any interference with the next combination. Toggle levers (d) and (2), then reset those levers. Eventually, toggle levers (8) and (i)
- Go downstairs (w ) into Busipah’s Mausoleum to pick up the fallen SMALL KEYS (we’ll come back upstairs later to complete this puzzle). Here is a brief outlook at Busipah’s Mausoleum:
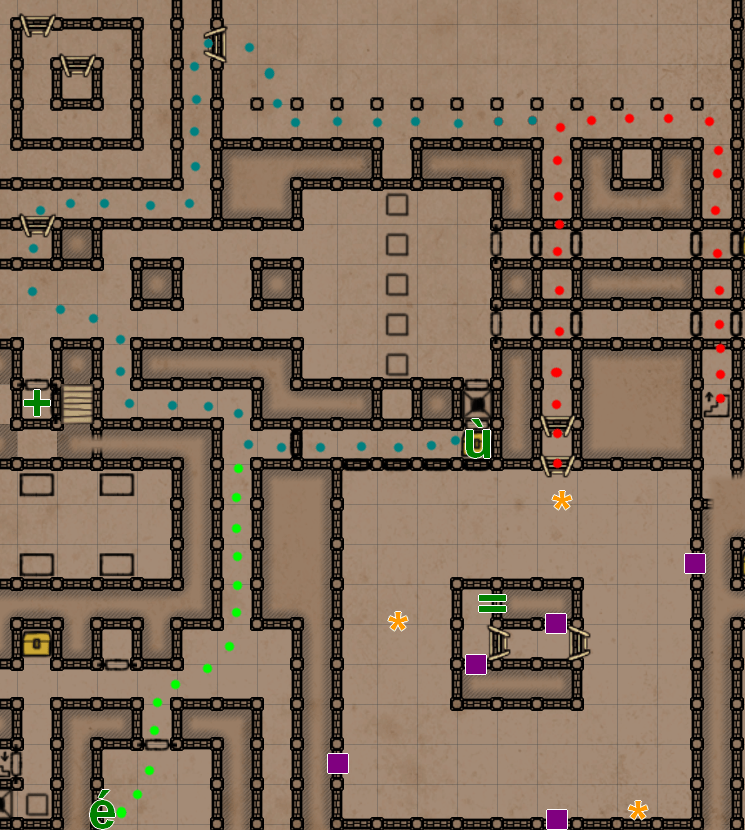
- Follow the red spots’ trail until you reach the big room where the SMALL KEYS have fallen down. They are marked with a yellow star (*) on the above map. Beware: there are 2 battalions of Skeleton Archers patroling in this area. Don’t get spotted… and remember to move fast. Grab the SMALL KEYS without getting hurt
- If you are swift and discreet enough, you might as well be able to have a look at the wall texts in this room ([]). It’s a code for a buried treasure
- Go up the stairs in the middle tower and press the wall button (=). It will switch a light on, pointing out a treasure chest (ù). We will take care of it later
- Come back and follow the turquoise spots’ trail to retrieve the STAINLESS STEEL KEY and grab the ORNATE KEY on the floor behind the grate at (ù)
- Come back and follow the green spots’ trail to enter the kitchen and get the EMPTY FLASK (é)
- Come back again and take the elevator (+) to Rukashan’s Crypt (back to the main map of this level)
- You arrive at (x) in a dark room with strange cubes. Press the wall switch to activate the cubes and start the puzzle (V)
- Your goal here is to push the 4 cubes ([]) towards the yellow floor tiles ([]). Every wall button in this room will reset the puzzle. The 2 levers will close the pits (except the one leading to the exit). The diagram on the map shows in which order you should move the cubes (1, 2, 3, 4) and where to slide them: [1] goes to [1], [2] to [2], etc.
- Here is a detailed walkthrough:
- First, stand at the tile at [3] and from here, push the cube [1] towards the east three times, then south twice, then west once;
- Pick up the EVERBURNING TORCH (z). You may equip and use it as long as you want;
- Toggle the lever (y) to close the pit (&) and pick up the TREASURE MAP in the alcove (&);
- Toggle the lever (%) to close the pit (#), allowing you to complete the puzzle;
- Push the cube [2] onto the tile [2];
- Push the cube [3] onto the tile [3];
- Push the cube [4] onto the tile [4].
- The pit ($) should close, allowing you to walk onto it and leave the room using the ladder
- Toggle every levers (a – i) and (1 – 9), then reset them: the main pit in Rukashan’s death chamber should be empty now
- Jump down, climb the ladder up and use the 3 SMALL KEYS on the lock (u): the magical protection vanishes and the Seer becomes vulnerable. His tombstone explodes in a blinding thunderbolt, releasing Rukashan’s corpse and last relics: the CRYSTAL NECKLACE and RUKASHAN’S SKULL
- Toggle the lever (v): this will trigger a mechanism that creates a path towards the spur at (a), allowing you to safely come back to the entrance of the level
Some of these tips don’t work or are unclear? You need further help? Your game is bugged?
Please email me: ydaujeard@gmail.com
